
⚠️ Important: Antivirus Software & First Run
ScreenRecorder Pro is a completely safe, clean application. However, because it is a small executable that accesses your screen, audio devices, and file system, some antivirus programs may flag it as suspicious — this is a known false positive.
If your antivirus blocks the download or prevents the app from launching, please follow these steps:
- Temporarily disable your antivirus before downloading and running the file for the first time.
- After the first successful launch, you can re-enable your antivirus and add ScreenRecorder Pro as a trusted exception (whitelist) in your antivirus settings.
- Windows Defender (built-in Windows security) may also show a "Windows protected your PC" SmartScreen prompt on first launch — click "More info" → "Run anyway" to proceed.
- If your antivirus quarantines the file after download, go to your antivirus quarantine section, restore the file, and mark it as trusted.
Why does this happen? Screen recording tools capture screen output and audio — the same permissions used by legitimate professional tools like OBS and Camtasia. This triggers heuristic scanning alerts in some security software even when the file is perfectly clean. ScreenRecorder Pro contains no malware, spyware, or unwanted software.
Why ScreenRecorder Pro Stands Out in 2026
In 2026, creators, educators, gamers, and remote workers all need a reliable, lightweight screen recorder that supports system audio without complicated setup. Most free options are either loaded with watermarks, bloated with features you never use, or require an internet connection just to function. ScreenRecorder Pro takes a different approach: a compact, self-contained Windows executable that does the essentials exceptionally well.
Built using modern Python libraries — OpenCV for frame capture, MoviePy for video assembly, and XVID codec for efficient compression — it balances ease of use with genuine power. Variable FPS from 5 to 60, loopback audio support, custom region selection, and instant screenshot capture cover 95% of real-world recording use cases without requiring any paid upgrade or account creation.
Whether you're recording a tutorial for YouTube, capturing gameplay footage, documenting a software bug for a support team, or archiving an online meeting, ScreenRecorder Pro handles it cleanly.
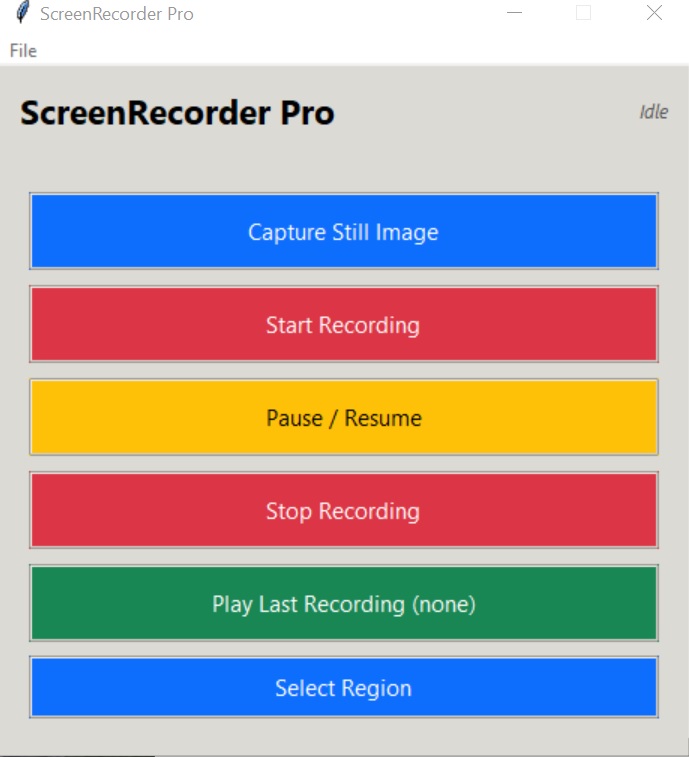
Main Interface Overview
The interface is deliberately simple and self-explanatory. Large, colour-coded buttons eliminate any guesswork — even a first-time user can start recording within 30 seconds of opening the app. Here is what each control does:
| Button | Colour | Action |
|---|---|---|
| Capture Still Image | Blue | Take an instant full-screen screenshot and save to your output folder |
| Start Recording | Green | Begin recording the full screen or selected custom region |
| Pause / Resume | Yellow | Temporarily suspend the recording without ending or saving it |
| Stop Recording | Red | End the recording, finalise the video file and save to output folder |
| Play Last Recording | Green | Open and preview the most recently saved video file |
| Select Region | Blue | Draw a custom capture rectangle — only that area will be recorded |
The status bar at the bottom of the window shows recording duration, current FPS, and audio device status in real time so you always know the recording is active and healthy.
Settings Deep Dive
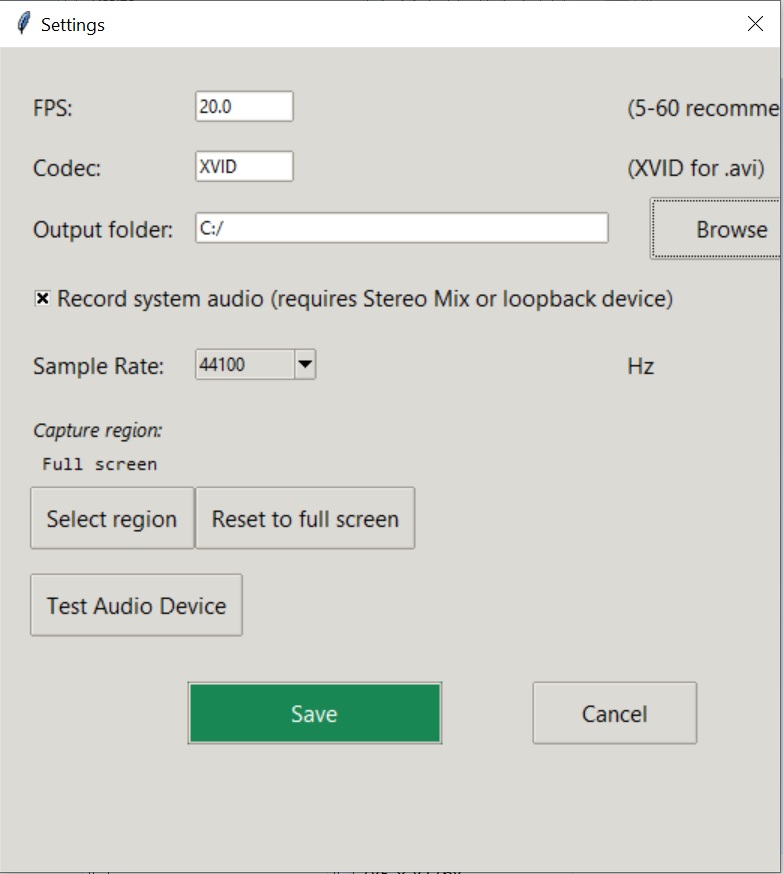
Access Settings via File → Settings from the menu bar. All the core recording parameters live here. Understanding each setting helps you get the best possible output for your specific use case.
| Setting | Options / Range | Recommended Value |
|---|---|---|
| FPS (Frames Per Second) | 5 – 60 | 20–30 for tutorials & meetings; 60 for gameplay |
| Codec | XVID | XVID — best balance of quality and file size |
| Output Folder | Custom folder path | Choose a folder on an SSD drive for smooth performance |
| Record System Audio | Enabled / Disabled | Enable for internal sound; disable for silent/screengrab-only |
| Audio Sample Rate | 44100 Hz | 44100 Hz — standard high-quality audio |
Choosing the Right FPS
Frame rate has the biggest impact on both video quality and output file size. At 5 FPS you'll get very small files suitable for slow-moving content like step-by-step written tutorials or bug documentation. At 20–30 FPS the video is smooth and natural for talking-head tutorials, screen walkthroughs, and meeting recordings. At 60 FPS, motion is completely fluid — ideal for gameplay captures, fast UI animations, or when you need broadcast-quality output.
Be aware that higher FPS settings require more CPU and disk write speed. If your recordings show frame drops or stuttering at 60 FPS, try reducing to 30 first, and ensure your output folder is on a fast SSD rather than a traditional hard drive.
Audio Setup & Testing
System audio recording (capturing the sound your computer is playing — music, videos, game audio, notification sounds) uses Windows' loopback recording feature, which requires either Stereo Mix or a Realtek Loopback device to be available and enabled in your Windows Sound settings.
Enabling Stereo Mix in Windows
- Right-click the speaker icon in your taskbar and choose Sounds.
- Go to the Recording tab.
- Right-click in empty space and check "Show Disabled Devices".
- If Stereo Mix appears, right-click it and select Enable.
- Set it as the default recording device or leave it enabled alongside your microphone.
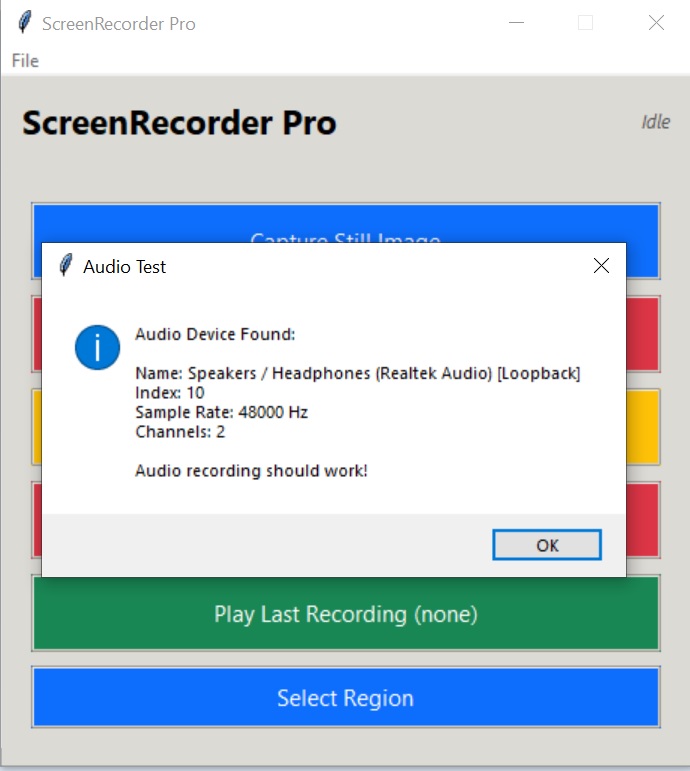
Before any important recording session, click Test Audio Device in the Settings window. You'll see a confirmation popup (as shown above) if your loopback device is correctly detected and working. Running this test takes 5 seconds and prevents the frustration of finishing a long recording only to discover it has no audio.
If the audio test fails, check that Stereo Mix is enabled in Windows Sound settings (see steps above), that your audio driver is up to date, and that no other application has exclusive control of the audio device. Restarting the app after enabling Stereo Mix is often enough to resolve the issue.
File Menu & Output Options
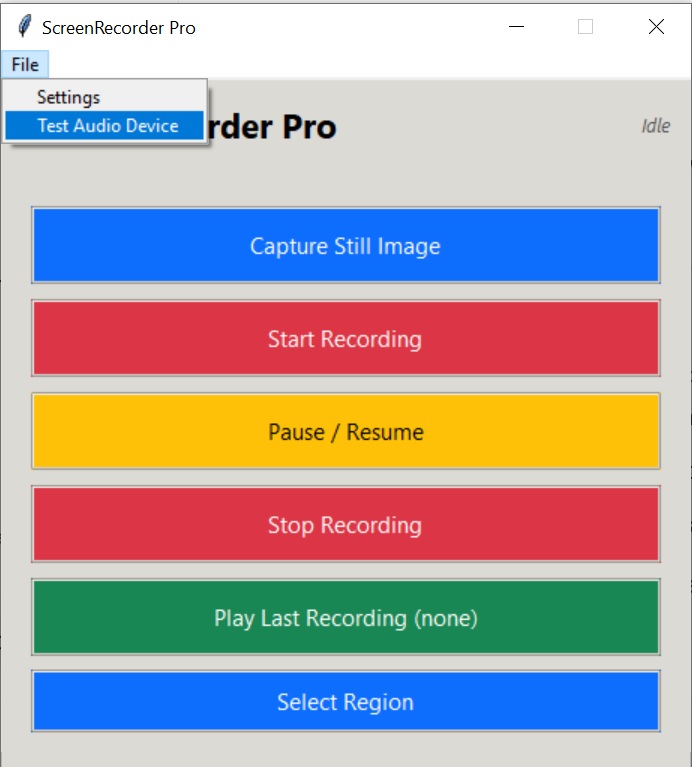
The File menu in the menu bar gives you quick access to the most important app controls beyond the main interface buttons:
- Settings — Opens the full settings panel to configure FPS, codec, audio, and output folder.
- Open Output Folder — Launches Windows Explorer directly to the folder where all your recordings and screenshots are saved. No hunting through your file system — one click takes you straight there.
- About — Shows the current app version and a link back to snoopbee.com for updates.
- Exit — Safely closes the application. If a recording is in progress, you'll be prompted to stop it first so no data is lost.
Recordings are saved as timestamped AVI files in your chosen output folder — e.g. recording_20260612_143022.avi. Screenshots are saved as PNG files with a matching timestamp. This automatic naming prevents any accidental overwrite of previous sessions and makes it easy to find a specific recording by date and time.
Step-by-Step Recording Guide
Follow these steps for a reliable, high-quality recording every time. The process takes less than 2 minutes from launch to pressing record.
- Download and launch ScreenRecorder Pro — visit snoopbee.com/downloads.html and run the downloaded .exe file. If your antivirus alerts, see the Antivirus & First Run section above.
- Open File → Settings and configure your FPS, codec, and output folder to a fast SSD location.
- Enable "Record system audio" in Settings if you want to capture sound from your computer.
- Click "Test Audio Device" — wait for the success confirmation before proceeding.
- Choose your recording area:
- For full screen: skip to the next step — full screen is the default.
- For a custom region: click Select Region, then drag a rectangle over the area you want to capture. The region selection is shown with a visible border.
- Click "Start Recording" — the button changes colour and the status bar begins showing elapsed time and live FPS.
- Use Pause / Resume if you need to temporarily skip content mid-session without stopping the recording entirely.
- Click "Stop Recording" when finished — the file is saved automatically to your output folder.
- Click "Play Last Recording" to preview the video immediately inside your default media player.
- Click "Open Output Folder" (via File menu) to access the saved file for editing, upload, or sharing.
Pro Tips & Best Practices
- Use 30 FPS for most content. It produces smooth, natural-looking video at manageable file sizes. Reserve 60 FPS for gameplay or fast-motion content where the extra frames genuinely add visible quality.
- Always record to an SSD. The sustained write speed of a solid-state drive ensures no dropped frames. A traditional HDD can cause gaps in recordings at 30+ FPS if you have many other background processes running.
- Test your audio before every important session. Especially after Windows updates or driver installs, the audio device configuration can silently change. The 5-second test saves you from silent recordings.
- Use Pause/Resume to clean up your edit. If you need to pause to look something up mid-tutorial, use Pause rather than stopping and starting a new file. Your entire session is saved as one clean video, reducing editing work later.
- Close unnecessary background applications. Chrome tabs, cloud sync services, and background update processes all compete for CPU and disk access. Closing them before a long recording session keeps frame rates consistent throughout.
- Use Region Select for focused tutorials. Rather than recording a full 2560×1440 desktop, select just the application window you're demonstrating. Smaller frame area = smaller file size + faster rendering + cleaner viewer experience.
- Organize your output folder by project. Create subfolders within your output directory named by project or date. The "Open Output Folder" feature in the File menu makes this quick to navigate.
- Add an exception in your antivirus after first run. Once you've confirmed the application works correctly, whitelist it in your antivirus settings. This prevents future false-positive interruptions during recordings.
ScreenRecorder Pro outputs AVI files using the XVID codec. This format is widely compatible with all major video editing software — DaVinci Resolve, Adobe Premiere, Vegas Pro, Kdenlive, and VLC all open XVID AVI files natively with no conversion needed. If you need MP4 output for direct upload to YouTube or social media, simply export/render from your editing software after cutting and reviewing your recording.
Frequently Asked Questions
Is ScreenRecorder Pro really free?
Yes — 100% free with no hidden payments, no watermarks on recordings, no time limits, and no account required. Download once, use forever.
My antivirus is blocking the download. What should I do?
Temporarily disable your antivirus before downloading and launching the file for the first time. This is a false positive — the app is clean. After confirming it works, re-enable your antivirus and add ScreenRecorder Pro as a trusted exception. See the full Antivirus & First Run section above for step-by-step instructions.
Can it record system audio (internal sound)?
Yes. ScreenRecorder Pro uses Windows' loopback audio feature through Stereo Mix or Realtek Loopback. Enable system audio in Settings, then use the Test Audio Device button to confirm it's working before you record.
What video format does it produce?
Recordings are saved as AVI files using the XVID codec. AVI/XVID is universally compatible with all major video editing applications and media players.
Does it work on Windows 11?
Yes. ScreenRecorder Pro is fully tested and compatible with both Windows 10 and Windows 11 (64-bit). It does not currently support macOS or Linux.
Can I record just part of my screen?
Yes. Click Select Region to draw a custom rectangle on screen — only that defined area will be captured. This is ideal for focused tutorials or recording a single application window.
Can I record gameplay at 60 FPS?
Yes. Set FPS to 60 in Settings. For the smoothest results, record to an SSD and close other background applications to ensure your CPU has enough headroom to maintain consistent frame capture.
How do I find my recordings after stopping?
Recordings are saved automatically to your chosen output folder. Use File → Open Output Folder to go directly to them, or click Play Last Recording to preview the most recent file immediately.
Is there a recording time limit?
No. You can record for as long as your available disk space allows. There is no built-in time cap.
Ready to Start Recording?
Free, no watermark, no subscription — download ScreenRecorder Pro and begin capturing in minutes.
⬇️ Download ScreenRecorder Pro Free →